This screen will allow users to view summarized Payment File data, view the status, and upload Payment Instruction Files. This screen incorporates existing data and functionality from the Payment Instruction File screen in PaymentWorks Classic.
Including:
- Date - Date of the file upload
- File Name - Clicking on the File name will open the file to allow the user to review the file contents.
- Uploader
- Bank Name
- Status - Current Status of the Payment File
- Open icon - Clicking on this icon will direct the user to the Batch and Payment screens in PaymentWorks Classic.
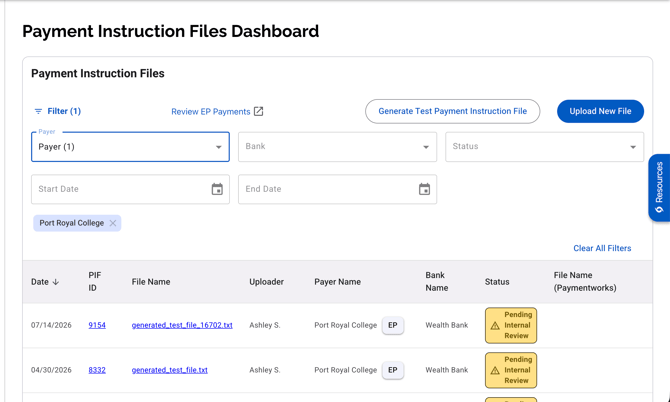
Filters
Users will have the ability to search results using the filters at the top of the page. The “Institution Name” filter will only appear for Payers that use this data element. When the filter is selected, blue chips will appear below the filters to indicate that the filter has been applied. The user may remove individual filters by clicking on the “x” in the chip, or remove all by clicking on the ‘Clear All Filters’ link.
![]()
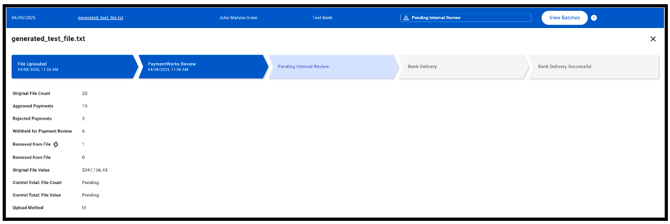
Payment Instruction File Expanded Detail View
Clicking on the file row will allow users to view the payment file tracker and review it as it progresses through processing. The expanded view will also display details of the file, including:
- Original File Counts
- Approved Records
- Rejected Payments
- Original File Value - (as a dollar amount)
- Control Total: File Count
- Control Total: File Value
- Upload Method
The detailed view will also include the time stamps as the file passes through the various states.
Payment Instruction File Upload
Users will also be able to upload their Payment Instruction File from this new screen. Users may upload one or multiple files. Only permissioned users will be able to access this functionality.
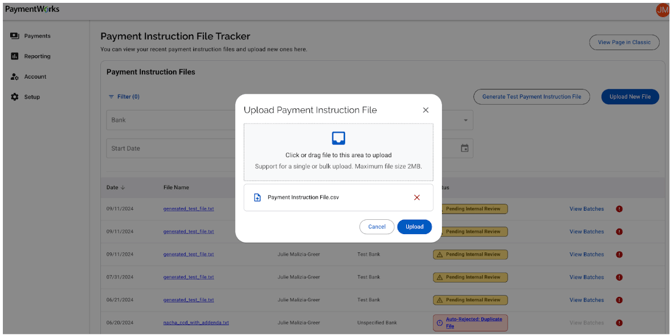
Users are able to drag and drop files as well as click to search files in their file system on their computer to select files to upload. Once selected, users may cancel individual files or the entire upload process. Clicking on upload once a file has been selected will start the upload process for the file.
Users may also click on the “Generate Test Payment Instruction File” button to generate a test file for testing and training purposes.
Payment Batches
Users will now be able to view the Payment Batches screen in the new Payment Experience by clicking on the ‘View Batches’ link on the Payment Instruction File Tracker screen. This screen has filters for Date Range and Status in order to narrow the display results.
The details regarding each batch will display on the Payment Batches screen. The batch details include:
- Batch Name
- Total Count
- Approved Count
- Indemnified Count
- Total Value
- Approve Value
- Indemnified Value
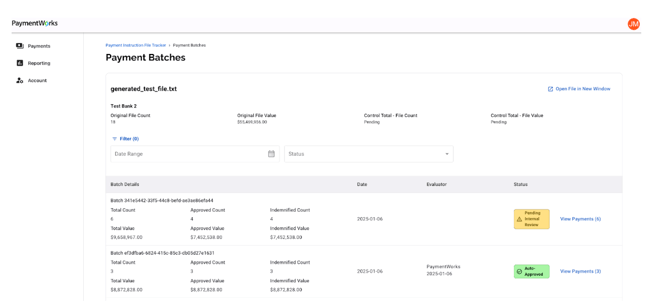
On the Payment Batches screen, users may also open the payment file in a new window using the “Open File in New Window” button in the upper right corner.
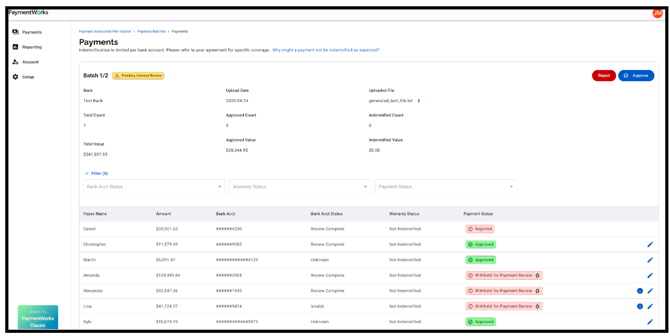
Payments
To view all of the payments within a payment batch, the user may click on the ‘View Payments’ link on the Payment Batches screen.
The user may also use the following filters in this screen to display applicable payments:
- Bank Account Status
- Warranty Status
- Payment Status
New Payment Statuses:
- Approved: The payment is approved and ready for release.
- Withheld for Payment Review
 : The payment requires further review by PaymentWorks before it can be approved.
- If approved, the status will update to Approved, and an email will confirm that future payments to the vendor will be processed.
- If we are unable to approve and indemnify the payment, it will be removed from the file and you’ll be notified via email.
- Rejected: The payment was rejected due to invalid bank account information or token.
- Removed From File: Removed by a Payer user. (Users will be required to add comments for internal use only.)
- Removed from File
 : Removed by PaymentWorks
NOTE: If a Payer is configured for Auto Approval of their payment instruction file, payments won’t show up in the Withheld for Payment Review status. After the file is processed, any payments that aren’t approved will move to Removed from file ![]() .
.
On the Payments screen, the batch details will again be displayed at the top of the screen. All of the payments included in the batch will be displayed in the table below. For each payment, the following info will be displayed:
- Payee Name
- Amount
- Bank Account
- Bank Account Status
- Warranty Status
- Payment Status
On this screen, the user will have the ability to take the following actions:
- Reject or Approve the entire Batch using the buttons in the upper right-hand corner
- Edit individual payments using the pencil icon to the right of each payment
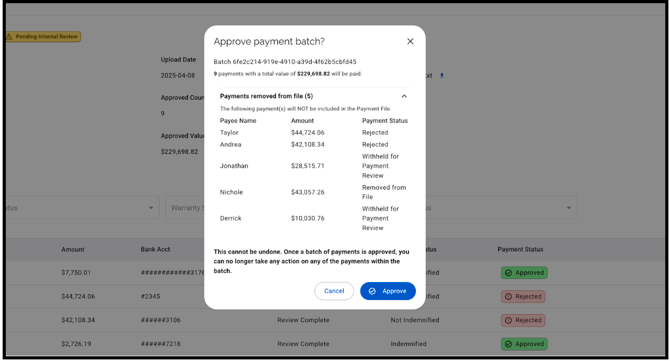
Approve or Reject - Batches or Payments
To approve or reject all of the payments within a batch, the user will use the “Approve” or “Reject” button in the upper right-hand corner.
Clicking on the “Approve” button will display an approval modal window. This will display a summary of the batch, including all Approved and Rejected payments, and allow the user to submit the entire batch.
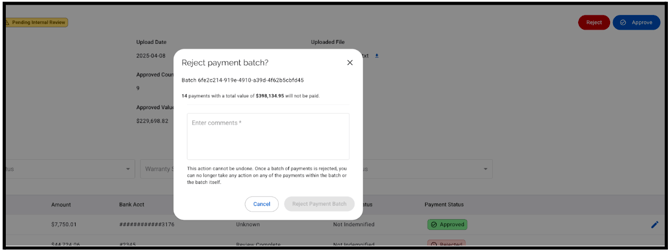
Clicking on the “Reject” button for the batch in the upper right-hand corner will display the reject modal window. This window will allow the user to reject all of the payments in the batch at one time. The user will be required to enter comments.
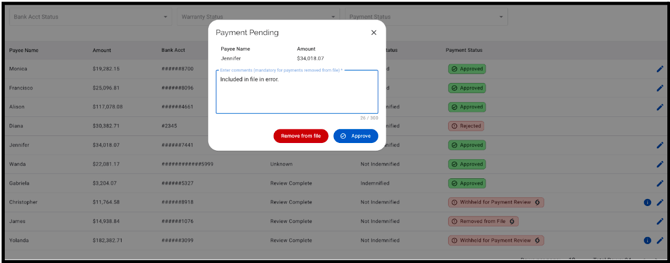
Approving a Payment in Withheld for Payment Review Status
 If the user would like to take action on a specific payment, they may click on the edit icon to the right of the payment. A modal will appear, allowing the user to take action.
- Payments that are in “Withheld for Payment Review by PaymentWorks” may override this review process and Approve the payment. Approving the payment will mark the payment as “Approved” and it will be included in the payment file. Please note that if a Payment has been Withheld for Payment review, approving the payment will override this process and the payment will not be indemnified.
![]()
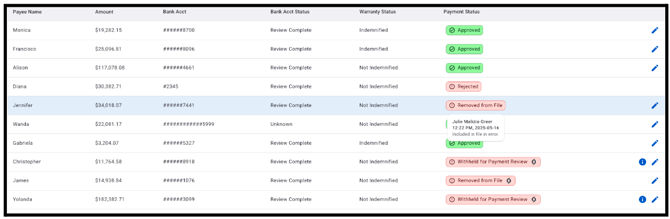
Removing a Payment in Approved Status
Additionally, if there is a payment in Approved status the user may remove it from the file. Removing the payment will mark the payment as “Removed from File” and it will not be sent to the bank. The user will be required to enter a comment in the comment field. The comments entered are for internal use will be able to be viewed via the tool tip to the right of the Payment Status.